Table of Contents
Are you working on any project where you have to automate the creation of a Power BI workspace? If so, then you have come to the right place. This blog will cover the process that can be obtained to automate the Power BI solutions with Microsoft Azure DevOps services. While this blog is highly informative, obtaining this is no hard and fast rule.
But, before you begin, you need to follow these:
- Permission to alter organizational or tenant level Power BI settings
- Permission to develop and handle Azure Active Directory users and groups
- Permission to manage and create Azure DevOps pipelines
Below are ten steps that can be followed to use the Microsoft Azure DevOps services to automate the Power BI.
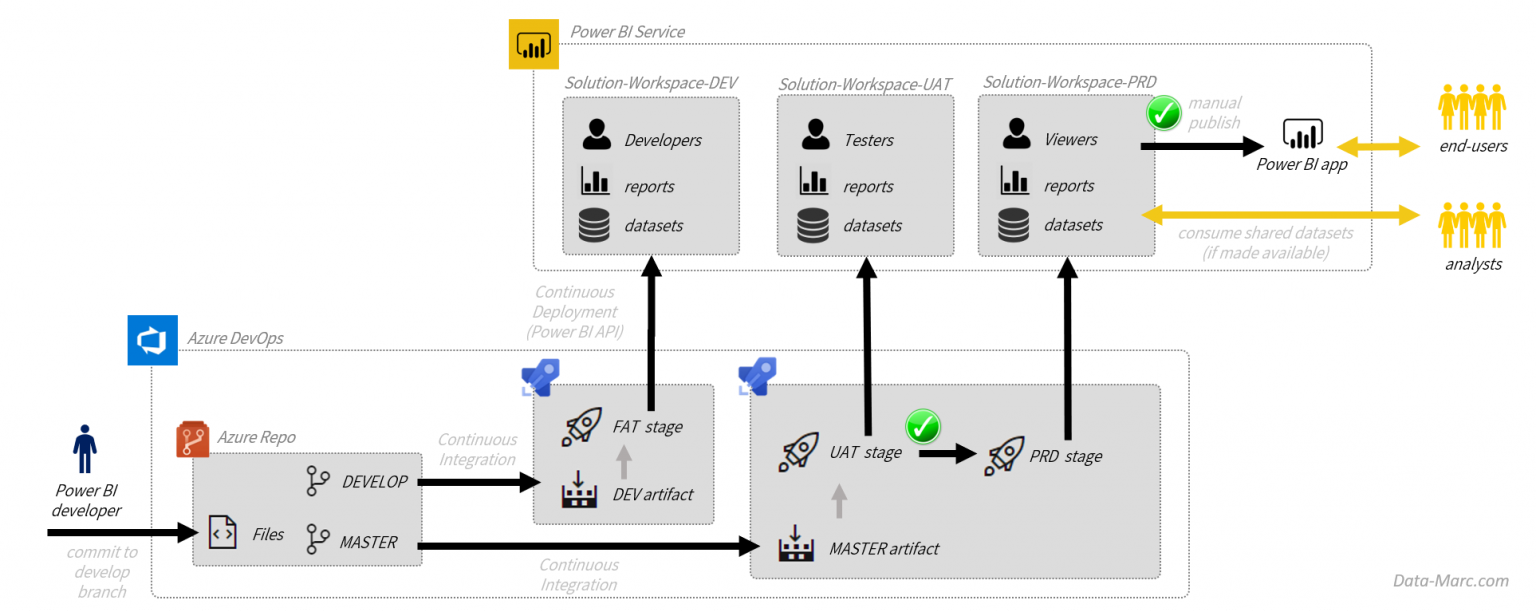
Table Of Contents
- Step 1: Generate a service principal for automation
- Step 2: Develop an application secret for the service principal
- Step 3: Reuse or create a security group for the security principal
- Step 4: Allow service principal-based authentication
- Step 5: Grant permissions to the security group
- Step 6: Install the Power BI PowerShell modules
- Step 7: Connecting to Power BI with the service principal
- Step 8: Creating the new Power BI workspace
- Step 9: Adding permissions to the Power BI workspace
- Step 10: Create Azure DevOps pipelines
Step 1: Generate a service principal for automation
If you want to develop a fully automated Power BI, you will surely want to run everything with the help of a service principal. Unfortunately, this will prevent you from signing as a user. Since you are already using Azure DevOps, using the same account to automate the Power BI service makes sense. Here, one point should be noted. You have to use the same service principal operating your Azure deployment. However, if you start from scratch, you will have to set up the Azure Active Directory first.
Step 2: Develop an application secret for the service principal
To connect the service principal with the Power BI, you must keep the application ID and an authentication key number ready at hand. Once the critical number for the authentication process is generated, you have to copy the values as correctly as possible.
Step 3: Reuse or create a security group for the security principal
To grant access for automation, the Power BI asks the service principal to be a part of the security group of an Azure Active Directory. You can surely use any existing group. However, it is better to create a new security group to avoid hassles. This new security group will be formed only for serving this purpose. After creating the group, you will have to add the service principal to make it a group member. This can be done either by using the application ID or the account’s name.
Step 4: Allow service principal-based authentication
Under the roof of Microsoft Azure DevOps services, One of the newest features of it is its ability to manage and authenticate Power BI resources in combination with a principal service account. For enabling, you will have to acquire the admin’s permission in the Power BI tenant. However, after logging into the Power BI, you can get continued access to the admin portal. Soon, you will find the tenant settings options appear on the screen.
Step 5: Grant permissions to the security group
By this time, the principal service authentication had already been enabled. Also, you have controlled it and managed to settle it in the particular security group. However, permission is required to create a workspace in the Power BI as this is not granted by default. So, reach out to the tenant settings and click on ‘create workspaces.’ Here, you have to flick the menu to enable the new workspace and then decide what you want to apply and how this applies.
Step 6: Install the Power BI PowerShell modules
In this guide, your main agenda is to orchestrate Azure PowerShell to enhance deploying the Azure resources to create the new workspace on Power BI. You have to create a PowerShell script if you are starting from scratch. Microsoft’s PowerShell scripts are interactive and can function with several resources like datasets, workspaces, reports, and profiles. In the PowerShell gallery, you can install each module separately.
Step 7: Connecting to Power BI with the service principal
Once the basic module has been established, you have to build up the connection with the service principal used earlier. Here, you will have to keep the application ID and the authentication key ready to secure the connection. Initially, the variables can be stored. But do not forget to change them later while adding the script to the Pipeline.
Step 8: Creating the new Power BI workspace
To create new workspaces in Power BI, you will need precisely what is currently provided by Microsoft Power BI. If you face any issues while working with the Power BI, you can use the built-in features to get out of it. As soon as you need to do anything connected with Azure, begin running into the issues propagated by the Power BI cmdlets. These cmdlets’ primary benefit is their incredible handling power of the authentication headers and base URLs.
Step 9: Adding permissions to the Power BI workspace
here, the workspace has already been created. However, the workspace now has access to only one account, and it is the service principal that has been created as the admin by default. So, you have to add access to a user account. A security group will also do, provided one of the users is added.
Step 10: Create Azure DevOps pipelines
Now that you have the PowerShell script ready, it can be used for automation. However, since the goal is to run it as the Azure DevOps part, you have to connect it to the Azure resource manager by utilizing the service principal.
Conclusion
Therefore, now you are entirely aware of the process you need to undertake to automate and deploy the Power BI solution with Azure DevOps. If you face any technical issue or are not confident about conducting the process, contact Techcronus Business Solutions by calling at +1 (415) 234 7510